Quick answer
A 360 product view is a loop of still photos from one full turn on a turntable, usually 24 to 36 frames. It is not a 3D model and not a video. You can shoot it yourself with a $15–40 table, a phone on a tripod, manual camera settings, and Spinnify to upload by SKU and show the spin on your product page after you paste widget.js once.
Most store owners still picture 360 spins as a studio project: motorized rig, retoucher, developer on call for every new SKU. That was the old playbook. Today you need a corner you can set up the same way twice, a turntable with clear degree marks, and a path from your phone to the product page that does not involve uploading fifty files into your CMS by hand. Spinnify handles storage and delivery; your job is to shoot a clean rotation and name the product correctly in Studio.
Below we walk from a DIY turntable to a live 3D button on a real product page. We explain what shoppers see, why the format is worth the setup time, how to avoid the flicker that ruins loops, how capture ties to your catalog SKU, and the mistakes teams repeat even after their first successful batch.
What is a 360 product view?
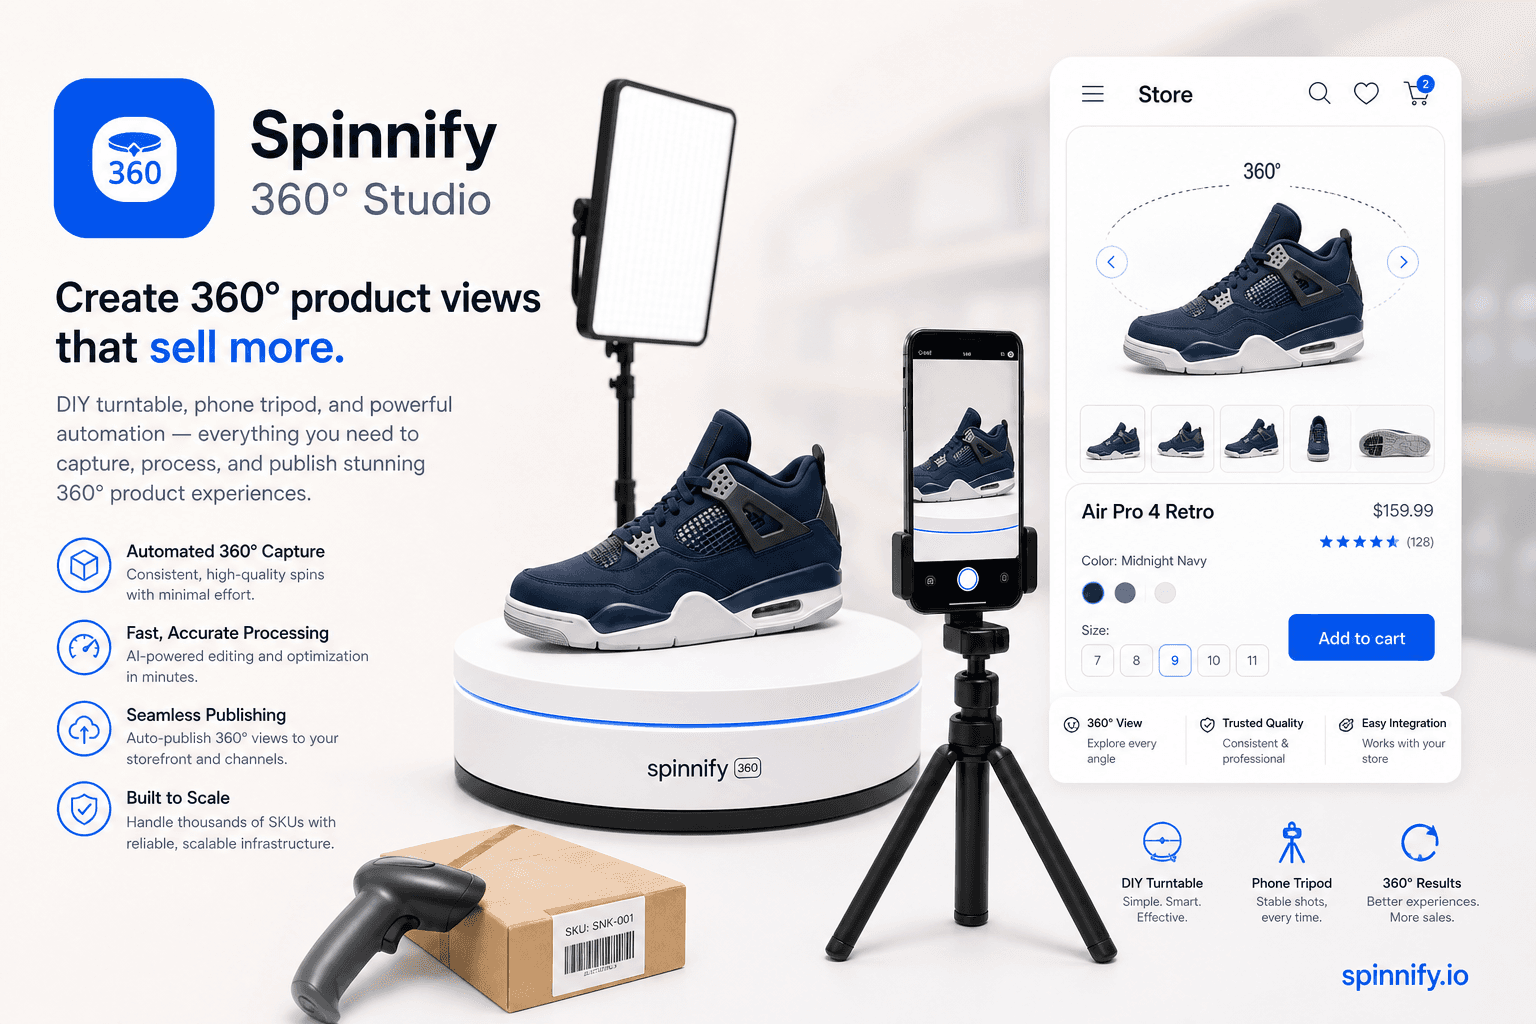
On the product page, a shopper drags left or right and the item appears to rotate. What they are looking at is a stack of ordinary photographs taken around a full turn. There is no heavy 3D mesh to download and no video player fighting for bandwidth. When the frames are even and well lit, the loop feels smooth; when they are not, the product seems to pulse or jump, and trust drops in the first swipe.
That simplicity is why small teams can own the workflow. You ship what you photographed. Optimized WebP and AVIF frames stay light on the wire. You can shoot on a plain table in a back room. Spinnify stores the series in the cloud, serves variants from its CDN, and opens the player only after someone taps 3D, so the rest of the product page loads at normal speed.
Why create 360 views for your store
Flat product photos answer one angle at a time. They rarely show how fabric catches light, how a handle sits in the hand, or whether the finish is matte or glossy. A spin does not replace good copy, but it closes part of the tangibility gap between what buyers imagine at home and what arrives in the box. NRF industry surveys often put online return rates near 19%, and a large share of those returns come down to the item looking different than expected. Richer angles help most when your baseline gallery was thin to begin with.
Measure your own catalog instead of trusting vague conversion claims from vendor slide decks. Watch add-to-cart on SKUs that gained a spin, read return reasons that mention photos, and compare time on page before and after. In practice, shoppers stay longer when they can inspect the product themselves, and support tickets that start with "it looked different on the site" tend to fall when the spin matches what you ship.
Cost matters too. A $20 turntable and a flat monthly subscription usually beat booking a studio for every inbound style, especially if you refresh catalog often. You are not buying a photography award; you are buying enough visual truth that a careful buyer can click Add to cart without guessing.
Step 1. Build a budget DIY turntable
Motorized tables that advance on their own start in the thousands. For ecommerce catalog work, a manual platform with visible marks is enough. Plan for 36 stops per full rotation, one every 10 degrees. That gives a smooth loop on the site without forcing you to shoot and upload sixty frames per SKU.
| Setup | Parts | Typical budget | How you turn |
|---|---|---|---|
| Lazy Susan DIY | Two MDF disks (~23"), 12" lazy Susan bearing, tape, marker | $20–40 | Manual: line up rim marks with a fixed pointer each shot |
| IKEA hack | SNUDDA turntable, flexible ruler on the rim | $12–15 | Manual: read centimetre marks each step |
| Arduino stepper | Arduino, stepper motor, driver, 3D-printed base | $40–60 | Semi-auto: timed steps; pair with burst in the app |
Whichever route you pick, give yourself a repeatable way to turn the same amount between shots. Tape a flexible ruler around the rim and place a fixed pointer beside the table. A pin stuck in a block of wood works; so does a pen taped to a heavy mug. If the rim measures about 120 cm around, each 10 degree step is roughly 3.3 cm along the edge, which is easy to eyeball once you have done it twice.
Cover the shooting surface with white matte acrylic or thick paper so reflections stay predictable. Laminate a small card with tripod height, light positions, and camera distance, and tape it to the leg of the table. The first time you rebuild the set after a lunch break, you will understand why that card pays for itself. Shoot one SKU slowly before you run a full inbound batch; the second item always goes faster.
Step 2. Lock camera settings so the loop does not flicker
Auto exposure is the fastest way to ruin an otherwise good spin. As the product turns, the meter sees more white backdrop or more shadowed side, brightness shifts frame to frame, and the finished loop pulses on the product page. The fix is boring and effective: put the phone in full manual mode before frame one and do not touch settings until the series is done.
| Setting | Recommendation | Why |
|---|---|---|
| Exposure | Manual (M) | Stops brightness jumps as the product turns |
| Focus | Manual focus on product centre | Prevents AF hunting between angles |
| Aperture | f/8–f/16 | Keeps the whole item sharp |
| ISO | 100 (or lowest native) | Less noise on texture details |
| White balance | Fixed preset or Kelvin | Stable background colour |
| Shutter | Match constant LED light (~1/125s start) | Even histogram across frames |
Light the set with two constant LED panels instead of flash. Place the key light at about 45 degrees to the product and use a second lamp on the backdrop so the background reads as a clean white screen. Once exposure, white balance, and focus are locked, you can often skip retouching entirely; the loop you preview in the app is the loop shoppers see.
Step 3. Shoot and upload with Spinnify
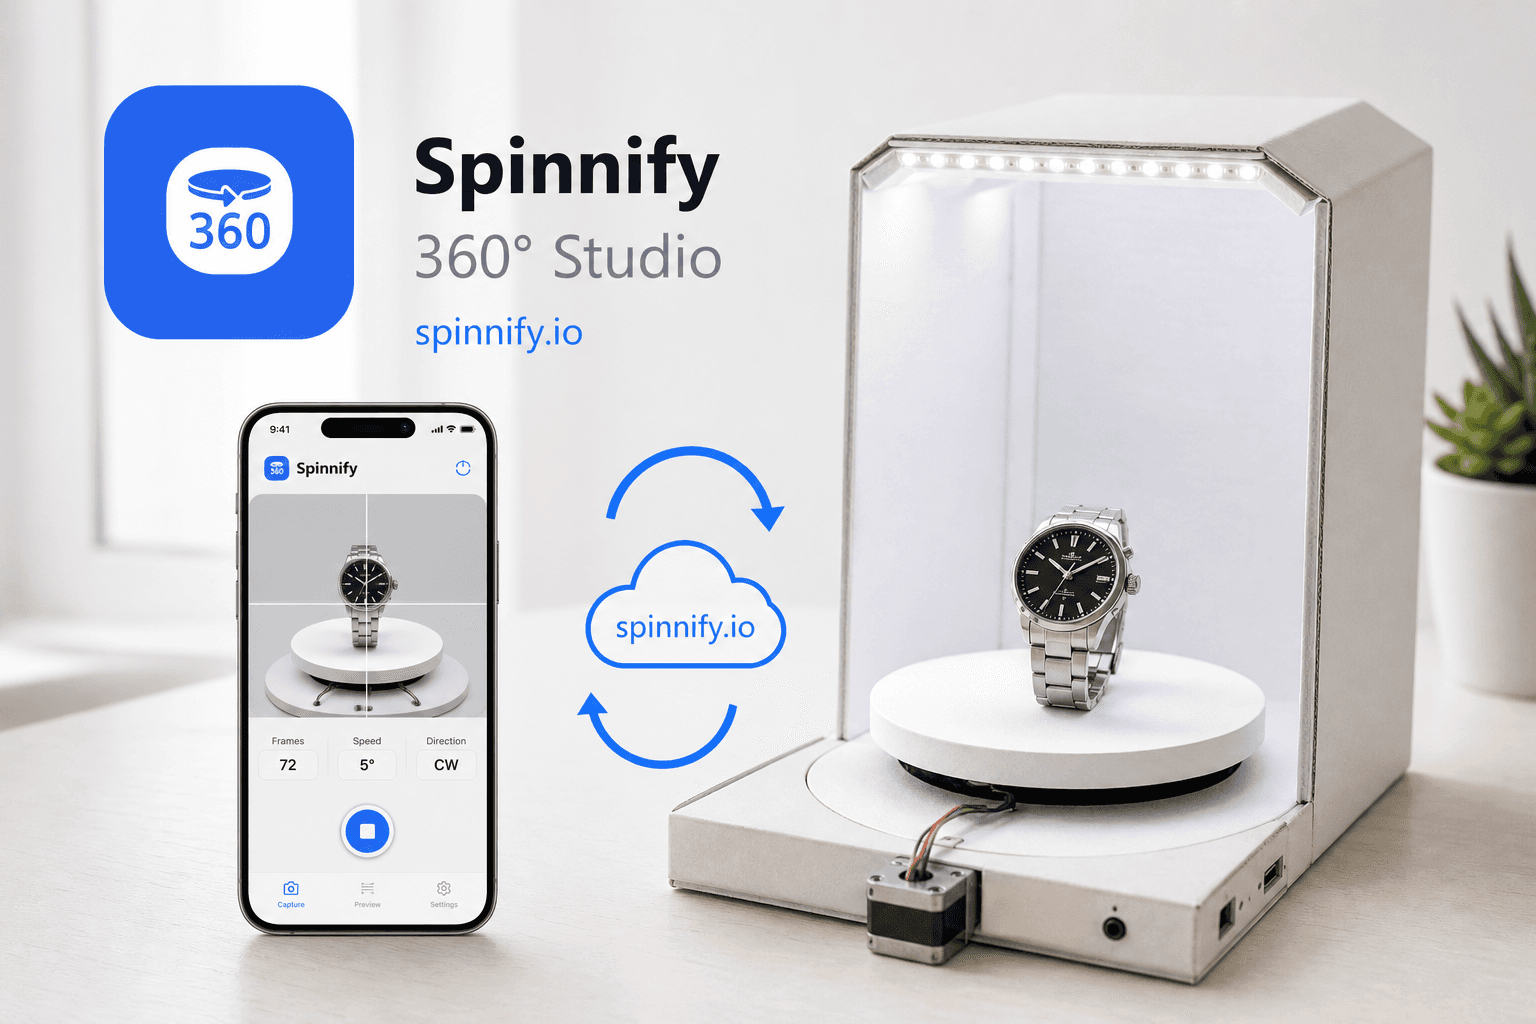
Spinnify connects three jobs that used to be separate: capture on the floor, storage in the cloud, and playback on the storefront. Install the official app from spinnify.io and add it to your home screen so it behaves like a native camera tool. Skip lookalike apps in the app stores; they are not tied to your Studio project.
- iOS: open in Safari, tap Share, then Add to Home Screen.
- Android: open in Chrome, open the menu, then Add to home screen.
Create the Studio product before the first frame
This single step prevents most "my spin is missing on the site" support threads. In Spinnify Studio, create a product whose name matches your catalog SKU. Letter case does not matter, but spelling does. Only after that card exists should you open the mobile app, sign in with the same account, type that SKU on the home screen, and open the product. Every frame you shoot attaches to that cloud folder automatically.
Capture the rotation
Mount the phone on a tripod at the product midline. In the app, lock exposure, white balance, and focus before you touch the turntable. Shoot PC photos in 4:3 for the main desktop spin, up to 36 frames per rotation. Mobile photos in 3:4 are optional if you want a separate pass tuned for narrow screens; keep the lights and tripod position identical if you do both.
Advance the table in equal steps using your rim marks, or use burst mode with a 0.5 to 2 second interval if your setup supports it. Type the SKU manually when prompted; there is no barcode scanner in the capture flow. When the series is done, scrub the loop in the preview. Twenty-four steady frames beat thirty-six shaky ones every time.
Upload what you shot
Tap Upload when the preview looks right. The phone compresses frames to WebP and sends them to your Spinnify project. There is no cloud crop pass and no automatic colour grading waiting on the server. What you approved in the preview is what buyers see after they tap 3D. Hotspots, billing, widget styling, and optional video uploads live in the web dashboard; the mobile app stays focused on frames and burst capture.
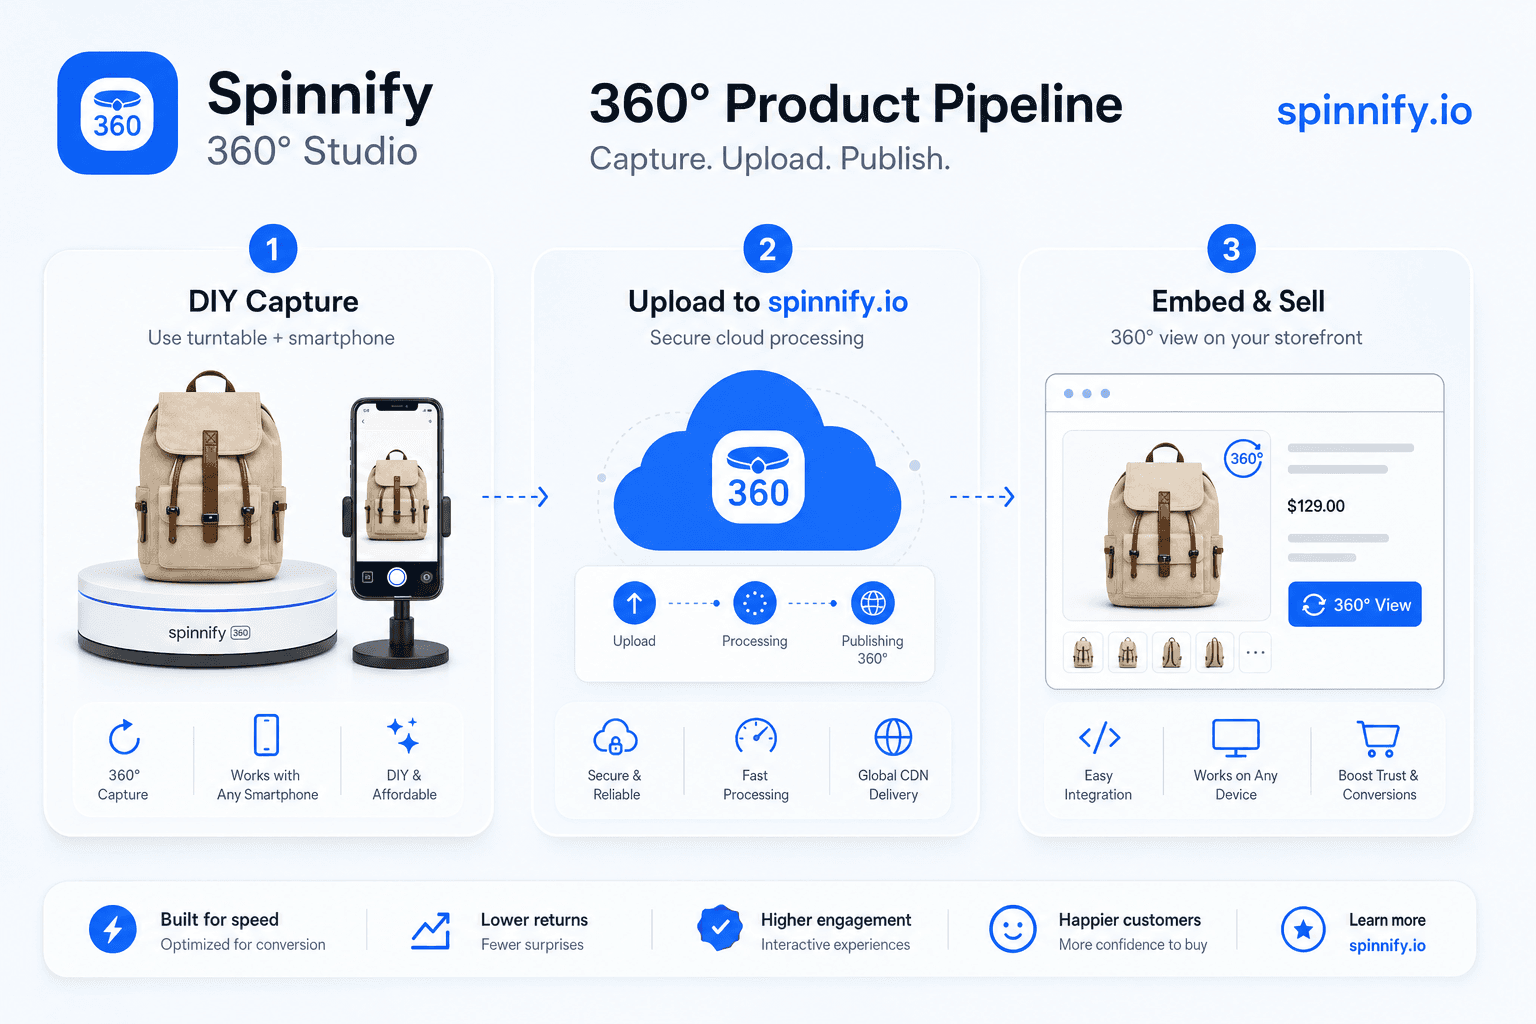
Step 4. Embed the widget once
After upload, active products are ready on the Spinnify side. You are not building a separate CMS gallery per SKU. Paste the loader script once in your theme footer or a custom HTML block, and let SKU matching handle new items as your team shoots them.
Copy the snippet from Spinnify Studio. A typical loader looks like: <script src="https://cdn.spinnify.io/widget.js" data-sku="YOUR_SKU"></script>. Replace YOUR_SKU with the article code from your product page, or use AUTO or URL modes if your stack exposes structured data or stable paths. If you self-host the script, swap the host per the integration guide for your platform.
| Mode | How it matches | Best for |
|---|---|---|
| SKU (manual) | data-sku equals catalog article code and Studio product name | Stores with stable SKUs on the product page |
| AUTO | data-sku="AUTO" reads sku from Schema.org Product JSON-LD | WooCommerce, Tilda, and other CMS with structured data |
| URL | data-sku="URL" matches normalized page path | Landing pages and portfolios without SKU fields |
Marketplaces and email templates that block JavaScript still have an option: generate a public view link from the dashboard. Shoppers get the same player in a standalone page without a script on the host site. See the integration guide for platform-specific notes.
Optional: hotspots on the spin
Hotspots are short callouts pinned to a detail that matters: a zipper pull, a port layout, a material swatch. In Studio, pick the frame where that detail is clearest, click to place a marker, and add a title plus a line or two of copy. Spinnify tracks the marker across the other frames so the dot follows the feature as the shopper rotates. A tap opens the card. Use them sparingly; three well-placed hotspots beat a dozen labels fighting for attention.
Your first 360 product view: a practical checklist
Print this once and keep it by the turntable until the rhythm feels automatic.
- Build or buy a turntable and mark 36 equal steps at 10 degrees.
- Set tripod height, two LED lights, and a white backdrop; laminate a setup card.
- Create the Studio product with a name that matches your catalog SKU.
- Install the Spinnify PWA, sign in, and open that SKU in the app.
- Lock manual exposure, focus, and white balance; centre the item on the disk.
- Shoot 24 to 36 PC photos in 4:3; preview the full loop before teardown.
- Upload from the app when the preview looks right.
- Paste widget.js once on the site with SKU, AUTO, or URL binding.
- Open the live product page, tap 3D, and confirm the spin matches the item.
Mistakes teams make again and again
Shooting before the Studio card exists is the classic one. Frames upload somewhere in the cloud, but nothing on the storefront can match them because there is no product folder keyed to your SKU. Create the card first, every time, even when you are in a hurry.
Hand-holding the phone feels faster until you review the loop. Small shifts between frames make the product appear to wobble. A tripod costs less than reshooting the batch.
Leaving auto exposure on produces the flicker buyers notice immediately. Lock settings once per session. Teams also wait for cloud retouching that never comes; Spinnify delivers what you shot, so fix light and centre at the table.
If a product is marked inactive in Studio, frames stop serving even though upload succeeded. And pasting a new script tag for every SKU defeats the point of binding: one embed, many products, matched by article code or structured data.
What it costs
Hardware is usually modest: $15 to $40 for a manual turntable plus two entry-level LED panels if you do not already own lights. That setup lasts for thousands of SKUs if you treat the laminated setup card seriously.
Spinnify Demo is $0 for up to two active products at 36 frames each, which is enough to prove the workflow on real traffic. Starter is $15 per month for up to twenty active slots. You pay for active products, so seasonal shops can swap items in and out without renegotiating a studio quote. Outsourcing a hundred SKUs at $30 to $100 per item adds up quickly; a corner you own does not.
Wrapping up
You can own this end to end: a marked turntable, locked exposure, Spinnify for upload and delivery, and one embed for the whole catalog. Pick one category, run the checklist once without rushing, then repeat on the next inbound styles. The second day is always faster than the first.
For phone-specific technique, see our DIY smartphone 360° photography guide. For shooting at receiving, read the warehouse 360° workflow post. To try the platform, visit Spinnify 360° Studio.